
Let me guess, you bought a fancy camera and are DYING to have more creative control over your photos. Like HOW can you take the mode dial off the little running person and still get a decent photo?! The answer is manual mode. You may know exactly what I am talking about, and you may not. But just in case, I am going to explain EVERYTHING right here. That way, when “photogs” start talking about manual mode, you know what the heck they mean.
Manual Focus versus Manual Mode
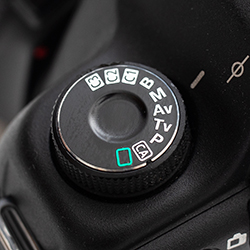
First of all, I have to address this confusing lingo. Often when we hear manual and camera together we assume people are talking about manually focusing an image. (By turning the focusing wheel on your lens.) These two features–Manual Focus and Manual Mode–are actually different! Manual Focus means you turn the toggle on the side of your lens to M and then turn the focusing ring on your lens to adjust the focus on your camera manually. Manual Mode requires you turn the dial on top of your camera body to the M and input your own exposure triangle settings to expose your image. Basically, you are in control of how much light is let into your camera to record the image.
The exposure triangle
Great. Well what the heck is the exposure triangle, right?! The exposure triangle consists of three settings on your camera that are connected to three physical parts on the camera. Each part of the exposure triangle controls the light entering the camera in it’s own way, and has its own creative effect on your image. The three settings work together to control the light entering the camera to record the image. In any auto mode, your camera uses a built-in light meter to decide for itself what settings to use based on what you tell it about your subject (I.e. the running man mode dial symbol is telling your camera you are photographing a moving subject, the person/head is telling it you have a still person to photograph, etc.).
These three exposure triangle settings are ISO, shutter speed, and aperture.
ISO controls the camera’s sensitivity to light and effects the level of grain and noise in your image. Shutter speed controls how long light is allowed to enter your camera. It affects the way motion is captured in your image. Aperture controls how wide the opening in the lens is set and affects the depth of field in the image (how blurry your background will be).
If that all sounds like GIBBERISH, it should! It takes practice to become familiar with these terms and what they do! If you look at the quick menu on the back of your camera, they are usually the settings running right along the top there. (slide to the second image in that instagram post!
The light meter
The light meter is your guide to connecting and measuring the exposure triangle. Your light meter measures the amount of light entering your camera, then compares that to the settings you have input to read that light, and gives you information back. In Auto mode, it measures that light and makes its own calculations about what exposure triangle settings it needs to use to create an image. In Manual Mode, YOU input all three settings
When you look in your viewfinder, you will see your light meter reading along the edge of your frame. It looks like a little number line with positive and negative numbers on it. You can also see it on your quick menu on the back of your camera. The light meter reading tells you whether the ISO, shutter speed, and aperture settings you have input are about to produce an overexposed (too bright), underexposed (too dark), or properly exposed image based on the light it is measuring.
How to master manual mode
I think learning each setting piece by piece is the easiest way to go about mastering manual mode. Your camera is equipped with two hybrid modes! These are aperture priority and shutter priority. Think of them as the stepping stones to using the big M. In aperture priority mode, you select the aperture you would like to use, and ask your camera to help you with the shutter speed. (You can also input ISO or leave it on auto ISO). In shutter priority, it is the opposite. You select the shutter speed and ask your camera to help you fill in the aperture to correctly expose your image. By focusing on one setting at a time, you can learn how making changes in them affect your image. I suggest you enroll in Manual Mode for Moms if you are REALLY interested in learning how to master manual mode though!
If you think you could handle this, but might need a few reminders, check out our manual mode cheat sheets that you can keep on your phone or print as a PDF!
Related Posts
Want to learn more about photography and manual mode? I suggest you check out these related posts on the blog!